Wednesday, July 31, 2013

Thrift Store Finds!!

Today was 1/2 off day at Value Village (the last Wednesday of every month) and we usually hit other thrift stores while we are out and about. Theresa told me about Value Village (VV) 1/2 off day and I do not believe we have missed the day since she told us.  We usually meet up there and shop together, searching for PC shoes, dresses, skirts, and sheets for material. Fun times!  I had to get photos of the things I bought at the different thrift stores and show the whole world!! :D

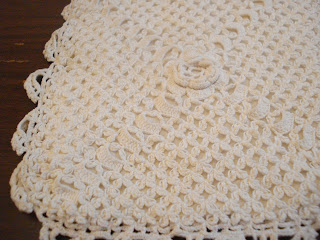
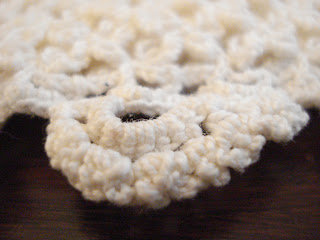
So first of all I found this crotchet reticule at the Salvation Army, cost $1.  I'm thinking Regency or Civil War? :D  There are such tiny stitches. ;P


Close ups of the crotchet flower in the middle and the trim.


At the checkout line in Value Village I found these two pearl necklaces, cost $0.40 each!  Rev War and Regency.  They are almost the same, except for the middle jewel and pearl. :P

Necklace #1


Necklace #2


Now this necklace I found at Value Village the last time I was there, cost $1.  Regency and Rev War for formal wear.


A wooden bowl to use while cooking at Latta, cost $1.75.  It is a little ruff on the inside, I am going to ask Abe if he will sand it down a bit for me. :P 


And last but not least I found this hat at Goodwill, cost c. $1.00. I love it!!!! :D  Look familiar Theresa? 
There is just a little tear in the top right though, I'm just going to sew it together and I think it will be just fine.. (crossed fingers) :P  I have so many ideas flying in my head for it I just don't know what I am going to do! :D


 It is 100% straw, so I can reshape it if I need to.


I am so excited with all my finds!! 
I had better get going LOTS of sewing and things to be done! ;)  I'll keep you posted!

~Bascha


Tuesday, July 30, 2013

Silk, Straw, and a Lot of Finger Pricking

First off I need to give a shout out to the very sweet young lady who was so patient in helping me with my bonnet from beginning to end.  Thank you F!  She blogs over at Ruffles not Rifles, and sews superbly!  If you haven't checked it out already, I encourage you to :D  And just so you know, the things done correctly on this bonnet are due to her good advice, and everything done incorrectly on this bonnet, is well, due to my own (not so good :P) advice.  And I need to put Bascha in the good advice category as well, she put up with several phone calls...and many notes :)

I would have really liked to have studied the insides of original bonnets.  I zoomed in as well as I could to pick apart the images online, but I just couldn't find a whole lot of photos of linings or frills for some reason. Maybe I was just searching incorrectly.  But anyways, without further ado, here's what I did.  

To begin, I of course bought the bonnet.  (actually, I should say my Mimi and Poppy bought the bonnet since they paid for it :) Love you!) It was $35, from Abraham's Lady. I highly recommend her company (as do many reenactors I know), and the lady who contacted me was super nice-she even put it online so I could buy it!  Shipping was like $10 though, so if you are in Gettysburg and want to buy the straw bonnet, drop by her store.  :)

Second, I collected the supplies I would need.  Leftover white cotton curtains from my tucked petticoat project for the lining, a 75 cent curtain to use as the frill, and some silk for ties and trimmings.  I got 2/3 yards silk for $10 (ouch, most money ever spent on one piece of fabric) off a scrap table when I went shopping with Bascha and her Mom.  I'm not sure exactly what type of silk it was-it had a slight sheen to it, it was an incredible tight weave with hardly a slub to be seen, and not quite as plasticy feeling as taffeta, but definetly stiff.  It both wrinkles and irons really well.  As soon as we felt it though, we all agreed it would make a lovely dress..except the 2/3 yard part :P  (I hated the taffeta....there was no way I was going to pay that kind of money for silk that felt like super thick flag material!  It was not at all what I was anticipating.)

Then I plunged into the construction.  To line the bonnet, I laid the fabric in it, making sure it was smooth at the round back part.  I pinned this down to make sure the back round part fabric didn't get any odd wrinkles.  I stitched this down with straw colored thread.  As for the rest of the lining, I measured down 4 inches from the brim and marked it all the way around with a pencil.  I cut along this line.  As you can see in the following photographs, the lining was very full around the edges, so I made some small pleats to tuck that excess fabric in.  Then I folded under the raw edge and stitched it down with straw colored thread.  
marking the lining
Measuring 4 inches from the brim on the lining so I knew where to cut it
cut bonnet lining in the full stage

pleated bonnet lining pinned

sewn bonnet lining
the lining makes me think of the amish and menonite caps
For the bavolet I cut a strip of silk 36 inches long, and hmmm, I think 5 inches wide.  I made a narrow rolled hem along the bottom, and the edges.  Before I box pleated it to fit the back of the bonnet, I folded over about 1 inch and using a large machine stitch just basted it in place.  After I had sewn the bavolet to the bonnet I removed the basting stitches.
pressing down one edge of the bavolet for the rolled hem
folding it over, tucking the raw edge in and pressing it again
after that I whipstiched it down doing a "blind" hem (not really blind...this was a very
tight weave) with about 2 stitches per inch
I box pleated the bavolet, and here you see it pinned to the bonnet
sewn down
You really wouldn't think that a bonnet would have much trouble staying on your head would you?  I didn't think so, but it does.  I used a couple scrap pieces of cotton twill tape for functional ties, which are the unseen ties doing the hard work of keeping the bonnet on.  Here is where I put mine.  
my fuctional bonnet ties
attached under the pretty bonnet ties
placement of both ties
bonnet ties before getting hemmed.  I narrow hemmed them also
1860s bonnet front - pink trim
This was my inspiration for the trim.  I just loved the poofs!
And I really wanted to find something original from the 1860's
to base my trim off of.  And I also found this little blurb when reading
something in an article on bonnets from the Huntingdon Journal (PA), August 2, 1854
 "A modest straw trimmed with white." So this just had to be :)

the trim


For the frill, I cut a peice of the curtain about 2 yards long (...I had a whole curtain, no need to be stingy) and 6 inches wide.  I put two rows of gathering stitches on one end and gathered the frill to fit the bonnet.  It covers part of the lining on the inside.  Then I sewed it down with straw colored thread across the gathers at the base of the frill, and then each side of the frill to the cheek tabs.  Then ta-da!  The frill was done :).  
hee hee, look at all my metal hairs! :P this was the frill pinned in

sewing the frill in
frill sewn to cheek tab
the frill sewn down
As of now, there are no silk flowers or things inside my bonnet.  Maybe I'll add a few one day, but then maybe I won't.  I'd really like some pinky-red flowers and light olive green leaves...not a bunch, but just enough to give a little color.  But anyways, here are a few pictures of the finished thing :D


My mom saw this picture and said "selfie!" (a term she just learned
a couple weeks ago) :P
Until next time!

~Theresa

Monday, July 29, 2013

Civil War Swiss Waist at Martha's Chapel

Well it has been a crazy week! These past couple of weeks I have been helping with Latta's Miss Jane's Civil War Camps and then this weekend was a Civil War Living History weekend.  I have worn my corset for 7 days in a row for 8 hours each day!  I have truly felt what it was like for the women of this time to wear corsets during the 1860's.  The corset has actually began to reform my waist into the hour-glass shape. :P  It has been great fun though! :D

During the camps I wore one of Latta's dresses and fell in love with it! So I decided to make one similar to it.

This is the one that belongs to Latta. Abe is wearing his Confederate Jacket I made and his Civil War shirt I hand sewed for him.  He was helping with the boy's Civil War Soldier camp.


I made my dress for this weekend but the forecast was  for rain all day. So I put it on just to show Theresa. :D  Then I took it off and changed into one of Latta's dresses. :P 

Let's see, my mom hand embroidered the belt. For the Swiss waist belt, I took Latta's belt and traced it onto my fabric and added 1/2 inch seam allowances with a hook and eye closure in the back.


Come, Thou fount of every blessing, 
Tune my heart to sing Thy grace. 
Streams of mercy, never ceasing, 
Call for songs of loudest praise. 
Teach me some melodious sonnet, 
Sung by flaming tongues above; 
Praise His name, I'm fixed upon it, 
Name of God's redeeming love. 


 Hitherto, Thy love has blessed me, 

Thou hast drawn me to this place. 

And I know Thy hand will lead me, 

Safely home by Thy good grace. 
Jesus sought me when a stranger, 
Wandering from the fold of God; 
He to rescue me from danger, 
Bought me with His precious blood. 


                                                         Teach me some melodious sonnet, 
Sung by flaming tongues above;  


O to grace, how great a debtor, 
Daily I'm constrained to be. 
Let Thy goodness, like a fetter, 
Bind my wandering heart to Thee. 
Prone to wander, Lord I feel it, 
Prone to leave the God I love; 
Here's my heart, O take and seal it, 
Seal it for Thy courts above. 


One of my favorite hymns! <3
 Come Thou Fount was written in 1757 by Robert Robinson.


You can just see my under petticoat peeping out. ;)


Haha, you can see my boots!


That was fun!  There were so many photos to choose from, it was hard to limit them. :P 


~Bascha