Thursday, October 31, 2013

Iced Blue Plaid

Well!  This isn't the blog post I thought I'd be writing, nor the post I would like to be writing.  But, I figure I might as well be open and honest with ya'll, and post my mess-ups as well as my successes.  This is, as I'm sure you have figured out by now, a mess up.  :O :P

Tomorrow (yes, we know, possible tornado warning, showers, wind, etc.) we are having a picnic.  Bascha and I have met this really neat girl online, via The Sewing Academy, and since she lives only a couple hours from us, we decided to meet up half way.  So we're having a Civil War picnic, and we're going to dress up, drink tea, make music and do other such lovely stuffs.

But back to my point.  Ann Marie, Caroline's best friend, is coming with us.  And...she hasn't got any clothes.  So, using some wonderful cotton plaid, I attempted to make her a dress.  I made 3 mock-ups, and when I thought I had it right, I cut it out.  It looked JUST LIKE THIS.  Down to the piping, the top-stitching, everything.  No kidding, but blue.
Victorian Civil War Girls Red & White Plaid Check Wool Hoop Skirt Dress
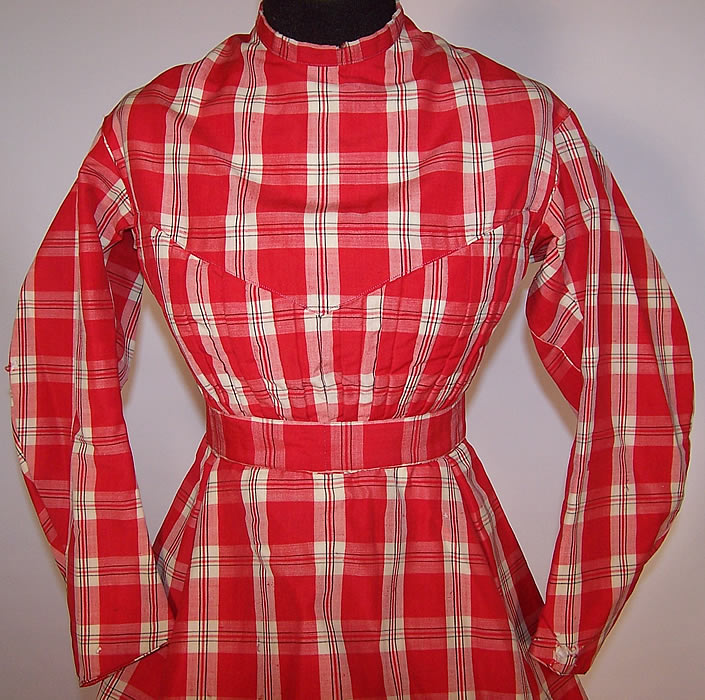
I just thought this dress was beautiful
And now for the bad news....it fit horrid.  Absolutely horrid.  (And yes, if I get really upset I say "hawrrid" with the proper southern accent.)  It actually like couldn't be put on at all.  So...I tried to fix what I thought was the problem, and apparently that created more problems.  So I ripped it up and tried to make a gathered part instead of pleated.  I thought I had it fixed, when yet again, it did not fit. :O  By then, you can imagine I was feeling pretty glum. :P

After talking with Ms. Rhonda (Bascha's mom), we thought maybe that the armholes were too small, because the sleeves were too small.   I added an insert of ribbon up the sleeve to widen that area.  The armholes were still too small, or high, or we're not sure. But it doesn't fit in that area.
Photo
ribbon insert
On top of the armhole issue, the back doesn't meet at the waist, and it buttons on a diagonal.  Yep. Didn't know that was possible, but it is.  So, the dress is unwearable.  Oh, and it chokes her at the neck. :P.  (she said her arms were choked as well.)

I found another curtain of this same fabric at VV yesterday, so I have enough to remake the bodice.  I don't have the time to do it before tomorrow, but I do plan on it someday.  Right now I'm sick of blue plaid!

There you have it!  I've had to eat my humble pie! :D  And I do mess up!
~Theresa

Tuesday, October 29, 2013

Of Wool and Fringe

Just finished a fringed wool shawl for Caroline and thought I'd share a few pictures. :)  I used the instructions found HERE.  I used around 2 yards of medium/lightweight wool, free to me from the stash.  This shawl was fairly easy to complete, but the fringin' did take a while.  Quite a while.  :)


What?  You think that's the chair I sat in?  Well how'd you know???
floor fringe as well.  will be vacuum fringe soon too.
So that's it, just a quick post this time!  I've got to get back to sewing! (and pinning on Pinterest....this pins and boards thing is taking up my life!!!!!)  Hope ya'll are having a wonderful week!
~Theresa

Sunday, October 20, 2013

Duct Tape Dress Forms

Guess what Bascha and I did today?  Got hot, sticky, and looked really funny. We actually duct-taped ourselves up and  made dress forms :).  There are several tutorials out on the web on how to do this, but maybe you follow our blog and don't feel like searching to see how it's done, or maybe you've never heard of duct tape dummies, so we'll do a little tutorial anyways :).

To begin, put on an old t-shirt, or one you don't really like.  You'll never have to wear it again.  It shouldn't be really tight.  (I don't know why, but that's what I read)  Make sure that you are wearing a good supportive bra underneath.
In most pictures of me I will appear to have my eyes shut.  This is because I always blink.  And it's just faster sometimes to look down and get it over with than take 15 shots so we can try to get my eyes open. :P
Then, start wrapping the duct tape around the rib cage under the bust.  The whole dummy will take a little over 1 roll of duct tape.
 Then wrap the lower portion of your body, going around in a circle.
Then upper body.  For the bust, be careful not to squish and minimize your chest...you're trying you replicate yourself, not make a new shape :).  We just put  smaller sized pieces of duct tape going in different directions to make it as smooth as possible.
We forgot to take a picture for this step.  sorry! :O
For the neck, put plastic wrap (I thought that stuff was only for left over food, but nah, it's for necks too) around your neck, and tuck it into your shirt.  Then duct tape that area too.  Please don't choke yourself.

Bascha was so funny, she had on a tank top, so she put a grocery bag on as a shirt (I think it could pass a modern Edwardian!), and said she was a earth friendly recycle person who was really into it :D  
For the arms, wrap it around so it's taped to the body, but you don't need much more than right below your shoulder.

Tada!  You look like a bonafide idiot now! :D  Go look in the mirror :)  Don't move your arms too much though, you don't want to mess up your hard work :P
me
Bascha

Now take a pair of scissors (not fabric scissors), and cut straight up the back.   Do not cut your bra...especially if it's expensive.  This dress form is supposed to save you money.

Now you've got your second body.  Lay it out on the floor or table.  Put some stuffing in the bosom dips.  We found it easier to stuff the bosom by putting in a lot of stuffing in the whole upper body, then taping the whole body shut, then adding more stuffing, taped the arm's shut, and then packed the filling in really snugly in the bust area.

Bascha's mannequin is stuffed with a variety of things since by then we had run out of stuffing.   Pillow insides, pillow cases, scrap fabric, torn tissue paper, tangled yarn, and pieces of wadded tape make up the insides of her second self :). 
Tape the back of the dummy closed, making sure not to leave a gap.

I taped the neck closed.  Then you fill the dummy with stuffing, making sure it's "packed" down pretty good. You don't want  the Madame to collapse while draping something.   :O.
my mannequin Lettice before we gave her a two inch waist reduction.  I'm not really sure what happened but her measurements were a little off! She still needs a bit added to her behind as well...poor lady! :O  I've named her Lettice since that's one of my first person names at Latta.


Bascha has given hers the name "BaJosh" *said in baby voice :D*  which is what my baby brother calls her.

There you have it!  And just for fun, we couldn't help but play with the stuffing...


~Theresa
and
~Bascha

Monday, October 7, 2013

Into My World of Draping...Part 1

A friend recently told me I ought to do a post on draping.  So I'll try. :P  I'll also try to not write so much, but I tend to get carried away pretty easily! :O Hee.

So to begin.

You will need: Fabric (muslin, cheap sheets, or something similar), a pencil or piece of chalk, the dress form, your body, or the body of your friend. If you are draping the back of a garment on yourself...you will either need a dress form or a trustworthy person.

You'll take your person, or your dress form, and "drape" your fabric over it.  Like so.

the green ghost
 Then you will pin the fabric to your person or your dress form.  (If you are draping on yourself, or on a person, make sure you are wearing a TIGHT fitting shirt or cami to pin to.  Nothing will happen to this shirt. (unless you accidentally cut it :P)) Pin the fabric smooth, and if you are draping something around the neck area, like a yoke in this demonstration, you'll need to cut off some of the excess fabric, and possibly slit the neck. Like so.

 Then you will take your chalk or pencil (beware that pencil doesn't always wash out.  If you're just doing this for the pattern, no biggie.  But if it's the real thing...chalk is better :D) and mark where you want the arm hole, shoulder seam, side seam, neckline, etc.  (oh, and if you are using chalk, it will write better if you lick the end of it.  If you don't want to lick the chalk, you can keep a little cap of water on the table and dip in there every now and then)


 After you've drawn your lines, cut the piece out.  You can either add seam allowance now, or wait until you draw your tissue pattern.  But DON'T FORGET! :)
 You may find it a bit uneven if it's a piece like this, so what I do is fold it in half, and then cut off the excess.
And if it's a piece like a bodice front, I will make the pattern so you lay it on the fold, when I make the pattern.
 And to finish, you lay tissue paper over your cloth pattern, and trace it over.  You can add tips for yourself to remember later, as well as grain lines and other such things found on normal patterns if you wish.  If you haven't added seam allowance, this is the time to do it.
Even if you drape, you will more than likely have to tweak.  You can mark these changes on your pattern pieces.  But that's it! :) I hope this was helpful!

I'll do another post on how to drape something with darts, or pleats/gathers later.

~Theresa :)

Thursday, October 3, 2013

Peplum Shirt #2 :)

I made another peplum shirt yesterday, and finished it just in time to wear to church last night :). It's made from the pattern of the first peplum shirt, with a few changes.  This is my favorite of the two so far :).

I used red and grey striped cotton knit, and it's a little thicker and not quite as stretchy as the material peplum #1 was made out of.  For the sleeves I traced out a sleeve shape similar to a regular t shirt sleeve, and then added length for the ruching up the center.  The sleeve also has a slight gather at the top.  

The fabric and the zipper were both free, so this shirt cost nothing! :) Here are some pictures of the finished top.

ruched sleeves! :)

I didn't really try to match the stripes up, but they do match just about everywhere :)  Go random pattern placements! :)

One more shirt left to go.  I think it will be my favorite....it's definetly going to be classified as "vintagy", a look I love but haven't tried to pull off yet.  Pastels...lace...fluttering....bows...flowers. :)

So that was Peplum Shirt #2.  Hope you liked it!

~Theresa

Tuesday, October 1, 2013

Peplum Shirt #1 :)

Peplum Shirt #1 is finished! And I am thrilled 'bout it :D.  

Last month at the VV I picked up a bag that happened to have, eh, nearly 6 yards I think of wonderful grey knit.  It's thin, but not so thin as to be sheer or anything, just thin enough to not be heavy.  And it has a drapey/bouncy feel to it which is sweet :).  It stretches very easily though...I'm not sure if this is typical for knit since I've never really sewn with knit before, but I found I had to stay stitch a lot of it so it didn't get wonky. 

I was prompted to do peplum shirt because it has princess seams which allow for a small waist and larger bust, and the actual peplum part of it, which gives room for larger hips.  (and it just looks twirly :D) I also just really liked this style.  In the beginning I tried to draw a pattern from a dress in my closet.  The dress fits decent but when I sewed up the muslin....it fit horrid.  I didn't try a second time, just moved onto another way of doing it.  I've draped on others before, but never on myself.  This was quite the experience!  Not that this would work for everyone, but it worked well I think, for me. And I didn't have to worry about doing a Full Bust Adjustment, which was nice :D 

So what I did, was literally drape the fabric over myself, pin it to myself, and then draw with chalk where I wanted the neckline, armhole, shoulder seams, front seams, waist line, etc.  And then I cut it all out, and sewed it together. 

For the skirt, I used the waist measurement, and divided it by 6.28.  Then I drew a quarter of a circle with that number, put 8 inches as the length, and then made a larger 1/4 circle line at the bottom.  Wow, that reads in a very confusing manner.  I did this. :)

For the sleeves, I just drew out a basic sleeve shape and sewed it to the armhole. :) They are more like cap sleeves than t-shirt sleeves, but that is what I wanted.  I had originally thought flutter/ruffle sleeves, but I will most likely save those for the next peplum top I make. 
I was feeling like a royal Greek something-or-other all wrapped in that fabric, so I did the queen wave....but after taking the picture I realized that was British, and not Roman. :P
yes, I was using the webcam screen as a mirror so I could see where
to draw. :P
Here are some finished pictures.  I will be wearing my peplum shirts with this long black skirt, since I don't wear skinny jeans plain, and I don't have any pencil skirts (I also read pencil skirts can make you look shorter....and I'm petite anyways so).


We have a variety of zippers in different lengths and colors in the stash, but nothing longer than 9in.  The day I finished this shirt, a friend happened to give us a sewing chest/table thing and inside was a bundle of 19in zippers, one of them being grey.  I think I only used 14 inches of it, but still FREE, and perfect! :)

Those pull lines coming from the side seam-that's ease.  The front piece was a good bit longer than the back piece, and I didn't know how to put them together unless I eased it.  
I hemmed the neckline and the bottom edge of the peplum, but I chose not to hem the sleeves.  I'm not really sure why I did that, but I think it looks better this way. 
One thing I found helpful while working on this shirt, was a page on proportions. Here is the link.
So that was peplum shirt #1 for ya! Hope you liked it! :) Tell me what you think, and if you have tips or ideas for my next one. 

~Theresa :)