Showing posts with label 1770's. Show all posts

Thursday, May 15, 2014

Nice and Plump, a Quilted Rump

Well, I've come to the conclusion that skirt supports are beneficial, very beneficial actually. Not only do they help prevent un-needed strain on the waistbands of heavy skirts, but they prevent discomfort on your waist as well. Plus, they give a nice poof, and help achieve a more period skirt shape.

For a year and a half now, I've been planning on make a "hip roll" or some other type of tie on "bum roll" to wear with Rev War outfits. This was my plan until a few months ago, when I saw Lauren's rump for under her wedding dress, and Merja's quilted bum pad. I should also mention this excellent post on 18th century skirt supports. After that I decided on more of a pad instead of a roll.

I had some linen scraps in the stash, so I put those to good use. For the batting I used cotton fluff. I apologize, but I did not take pictures of the beginning process. But to make one, you basically cut two pieces of fabric , the width of the back half of your body. or a little more. Then you quilt it in some manner, with fluff between the two layers, pleat the waist, and attach it to a tie. It's very basic, and overall does not take much time to complete.

Here is mine :)
the false rump quilted, but not pleated
quilting :)


close up of the waist pleats. My bum pad was substantially thicker than Merja's, so I was not able to do as many pleats as she did. I have a total of 4 pleats. 2 knife pleats and 1 inverted box pleat.
showing about where it came after I pleated it.
finished :) Madame is modeling it for me


If you've got a few hours on your hands, I suggest you make a quilted rump as well. I can see this being one of my new favorite items in my historical wardrobe.

~Theresa

Thursday, November 21, 2013

1780's Style Garters

I've always wanted to make garters.  I never wanted to just use a piece of ribbon or string for fear of red welts and lack of circulation.  And elastic in the 1860's, though period, never had too much of an appeal to me.  Merji made a lovely pair of silk garters which I was looking at the other day, and when reading one of the comments (in Finnish....I couldn't understand it) there was a link, so I pasted it in my search bar and boom!  Hey, look what I found! Aren't they so pretty?
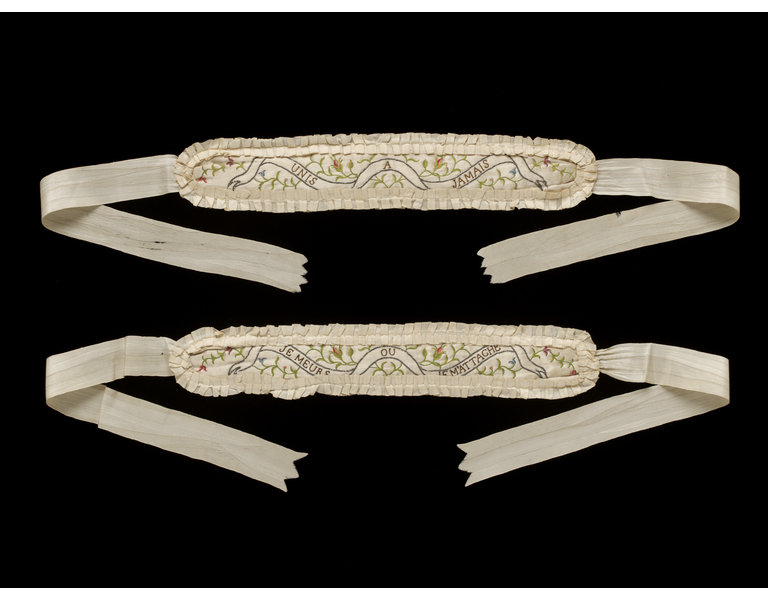
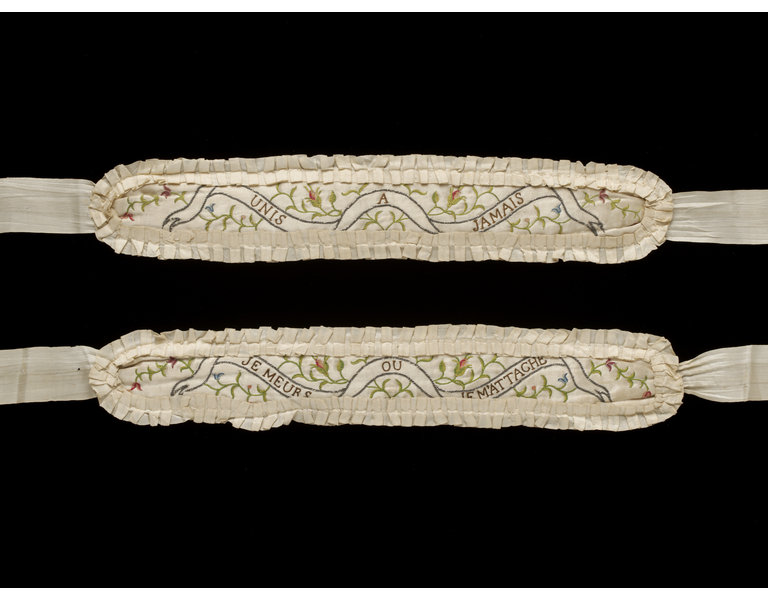
embroidered silk with silver thread and silk ribbons
1780's ladies garters
These garters combined the tie method with something pretty and a little less painful looking.  They are silk, with embroidery, silk ribbons, and pleated silk trim.  They were made in the 1780's, but I figure 10 years difference to 1770's won't be too bad, and neither would wearing them for regency.  Bascha and I both have the period correct knitted stockings that come way up your legs, and Bascha's stockings give her a headache by being rebellious and not staying there.  Mine are getting pretty annoying as well, I am going to make me some knitted ones here in a sec.  Caroline's are a mess, and she uses rubber bands (owwie) as garters.  But back to the point, we needed garters.

Bascha just turned 18 this month, and so I decided to make these for her birthday :).  Happy Birthday Bascha!!!

If you remember the silk trimmings on my Straw Bonnet, I had just enough left over from that project to make up a pair of garters. I don't know how these artifact garters were made.  But here is how I made mine.  And I tried to make them as similar as I could.

I wasn't sure about exact measurements, but I guessed that the decoration part probably went halfway around the leg...that part being the front.  So I held the paper around my leg, a little above my knee. Yup, that worked.

I was also guessing how wide the garter should be.  I went with around 1.5".  Using these measurements, I drew out a shape like the original pair onto a scrap of fabric.  I added seam allowances, and cut out 4 of these (two per garter).
my paper pattern/guide and the silk
I printed out the picture of the artifact garters and traced the design over onto a piece of paper. This was to get the hang of drawing it.
I drew over my pencil markings with sharpie so I could literally "trace" the design to my silk.  I wanted to be able to see it through the fabric.
Then I ever so carefully transferred this onto my silk.

I took the embroidery floss and separated it so I was only using two strands.  When I looked at the original embroidery it looked "thin".  So that's what I tried to do.
squeals!! look at all that embroidery! I just love how embroidery looks, but man I hate doing it :P (also, if you are wondering why it's on a plate, I love eating garters of dinner...(I couldn't get the focus/light right))
I tried to analyze how the garters were sewn together.  I couldn't really tell, but this was how I did it.  I put the fabric right sides together and stitched around the edge leaving a small gap on one end. Then I in-sided them out.  About the little hole on the end...it was where the ribbon ties were attaching anyway, so I just tucked the seam allowance in and sewed it down when attaching the ties.

For the ties-I did not have silk ribbon.  I wanted silk ribbon, but I was scared that if I ordered it it wouldn't come in the same color as my silk.  So I...used *whisper* polyester ribbons (which was also a lot easier), that matched.  I pinked the edges how they did though, and then sealed it off with clear nail polish.

I sewed them down to the garters, re-enforcing where they attached with lots of back stitches.  I did gather them slightly before attaching.
Tie attachment
Moving on to the trim.  I cut out several little strips of silk on the bias so they wouldn't fray.  Then I box pleated them to make the trim like pictured in the original.  But-I just really didn't like the way it looked on the garters.  It seemed to take away from the embroidery, add bulk, and just not flow prettily.  So I opted out on that step :(.  I guess now I can't really say I replicated the original garters can I? But at least I tried.
I'm done!
mama modeling for me :D Bascha's legs aren't available at the moment :P
the ribbons are very long right now, I wasn't sure how long to make them


I had meant to use navy instead of that vibrant blue for the ribbon embroidery...but it didn't work out.  I can't remember why though


One of them says "UNIS A JAMAIS" which is supposed to mean "United forever" The other one says "JE MEURS OU JE M'ATTACHE" which the site says means "I die where I cling" or "I must love or I die".  If I had thought about it, I would have put something lovely and poetic, about love and friendship....but I didn't think about it until it was too late.  Sorry Bascha!!!!

 Wee!  Aren't they so cute?  What do you think of these?  Do you wear garters?  Have you ever made some?

~Theresa

Sunday, November 10, 2013

Hand sewn, Pink Taffeta Plaid and Chocolate Brown Wool Polonaise

Life has just been so busy for me these past days, I haven't had time to post it till now. :P  Here (finally) is my Revolutionary War Polonaise dress that I made for the Rev War weekend at Latta in September!   I have always wanted a polonaise, so when I finally made one I was overjoyed when I finished sewing it. <3

 The chocolate brown wool I first bought around two years ago for Regency trousers for Abe. After I found the 2 1/2 yards of pink plaid taffeta at Hancocks I decided I would like to use the wool for my polonaise. :D  I used J.P. Ryans polonaise pattern and this was the first time I truly custom fitted a pattern. I absolutely love to fit patterns now!!!  I had so much fun with it and it was so easy!

Oh by the way, I hand sewed the entire dress and petticoat!!

Here is my mock-up:

Of course I had to shorten it, my waist is quite short. :P

I also had to take up some material on the side and the center back

And the shoulder straps


This is the material I used for my front, back and shoulder strap lining. For the sleeve lining I used muslin. The dress is from none other than VV!  I love the embroidery on the neck!

Pleating the polonaise skirt

The bottom point was a little odd but I think it still came out pretty good.


 The skirt attached, side.  I have a dart in the sleeve at the elbow.


Back before boning inserted


Attaching the lining. I did it the historical way, sewing the lining directly on top.


Now I had to sew the center back together to start the casing for the boning in the back.


I inserted the boning ( 1/4'' reed) and pined the material together then sewed close to the reed.

Sewing the boning in the center front.


I tried to make my own ruching from my pink taffeta and tried to hem both sides of my material. I will just say it didn't work to well. :P I ended up using pink ribbon from Hancocks. A nice old lady at Latta suggested  to cut it out on the bias. :D Next time I will definitely try to cut it on the bias!

I pleated my ribbon ruching as such: 1/4'' knife pleat to the right,

1/4'' knife pleat to the left to complete an inverted box pleat,

1/4'' knife pleat to the left,

1/4'' knife pleat to the right to complete a box pleat.

Then sewed the ruching down in the middle

I attached the ruching to the sleeves and center front. :) I really like ruching.


Me sewing my dress! I did not leave that chair very much. :P
And don't worry I am half way through!


The lovely hooks!

Now when I sew my hooks and eyes I sew it down in multiple places. So I thought I would show you all how I sew my hooks and eyes down, I have my needle pointing to each place:


Sewing them down in these key places helps to cement the hooks and eyes down.


There was a little bit of space showing in my center front so I sewed this rectangle together for a little flap on the back side.

Like so.


Preparing for the hem, I laid the dress down and then stretched the skirt out and took off as much as I needed. 

My brass buttons on the back to hold the skirt up.

Sewing the ribbon down in the same place as the buttons on the back side.


Oh lol I made this bum roll quite awhile ago, and I wore it under my polonaise.

My baby, Maple for some reason really likes it...... :P


This is a thin linen shirt I used for my petticoat waistband. Of course from VV. :)


waistbands

They were each 3/4 of inch wide by half my waist size.


This Measuring Gauge is my best friend in sewing. I use it quite a bit, especially when I am ironing hems down. If you are new to sewing I would suggest you get one of these!!


I really love this petticoat. The linen waistband is the perfect touch for it.

FINISHED!! 12:44:39 a.m.  I was going to wear it the next day. 
I always seem to finish garments the night before or the day of. : /  

Theresa and me <3

These were the only two photos we took that weekend. lol

My brother and I have a weekly class in this beautiful old neighborhood so we decided to take the rest of my photos in that neighborhood. It was so pretty with the leaves changing colors and falling ever so softly to the ground.  :)


Fall and Spring are my favorite seasons! 

The owner of this house was so nice! She came out as we were getting some photos and said we could use her porch and chairs for photos!!  She said she has had a lot of people come to this neighborhood to get wedding photos, she also thought Abe and I were getting married.............. Anyways I am very grateful to her for allowing us to use her house and yard. :D
Here you can see my polonaise (skirt lift in the back).


I love the pillars.


My loving brother Abe wearing his birthday present, a kilt. :)

The brooch I bought at an antique store located down the road from there.


I now have my favorite dress on the blog!!!   I had a great time taking these photos with my brother and my mom, love you guys.  

Well till next time my good friends! Enjoy the rest of Fall!!

Affectionately,
Bascha