
To begin, put on an old t-shirt, or one you don't really like. You'll never have to wear it again. It shouldn't be really tight. (I don't know why, but that's what I read) Make sure that you are wearing a good supportive bra underneath.
 |
| In most pictures of me I will appear to have my eyes shut. This is because I always blink. And it's just faster sometimes to look down and get it over with than take 15 shots so we can try to get my eyes open. :P |


We forgot to take a picture for this step. sorry! :O
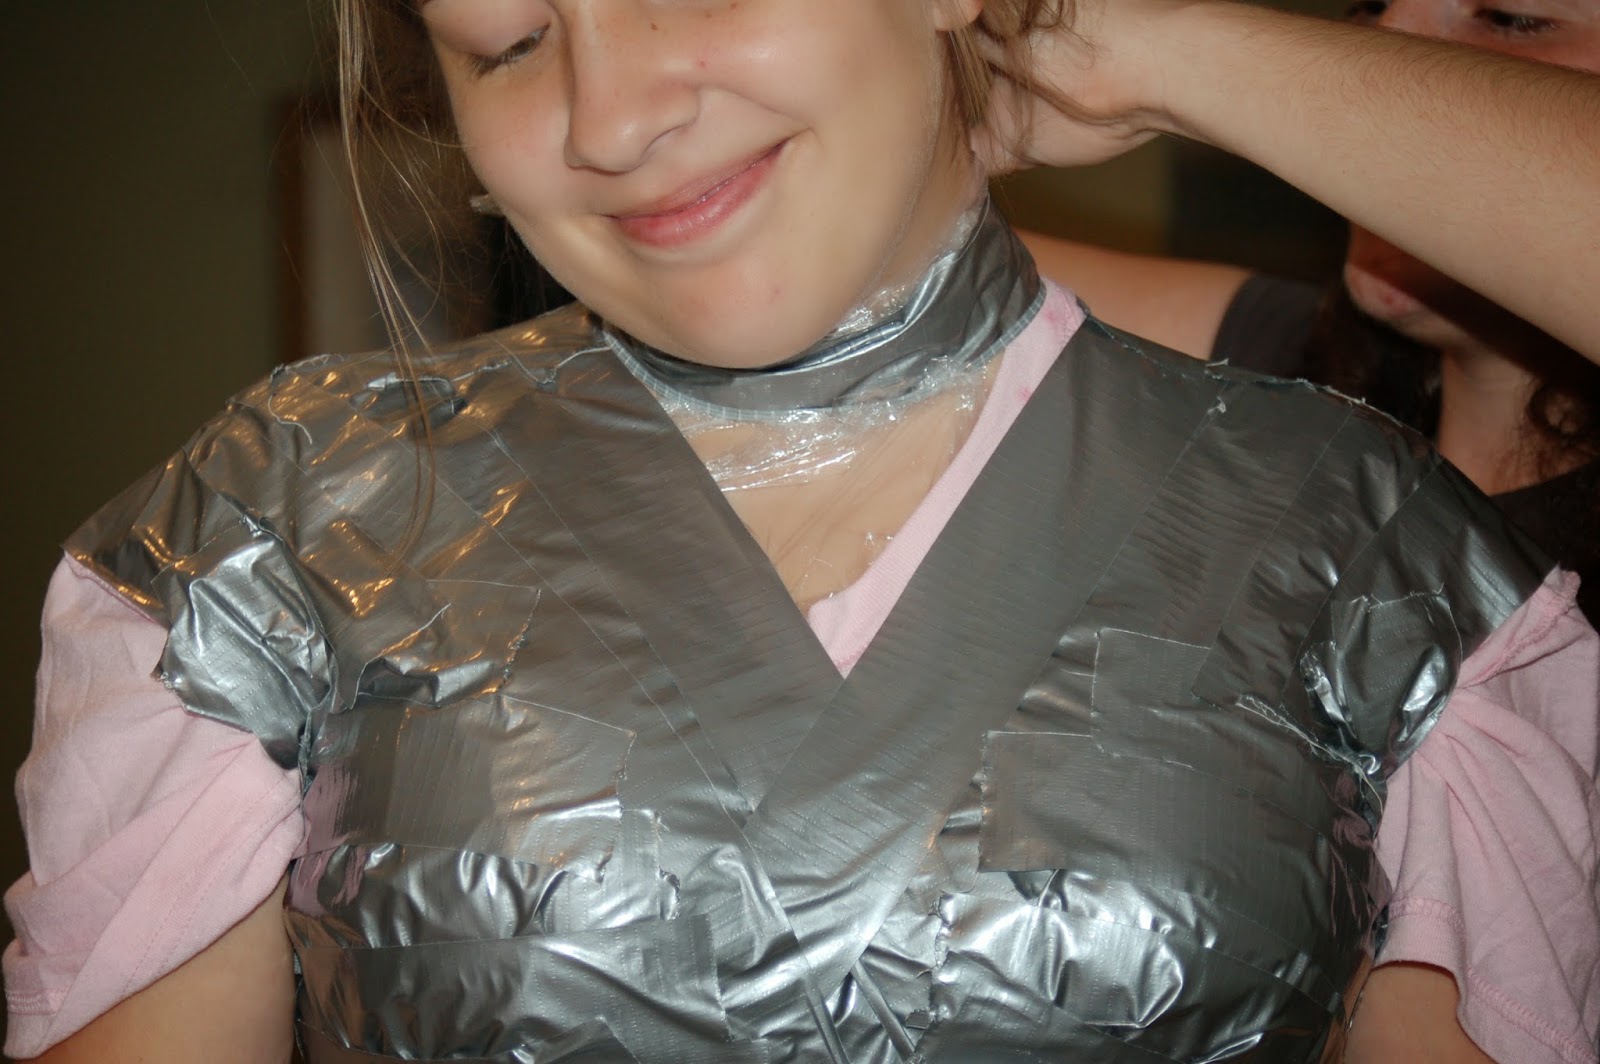
For the neck, put plastic wrap (I thought that stuff was only for left over food, but nah, it's for necks too) around your neck, and tuck it into your shirt. Then duct tape that area too. Please don't choke yourself.
 |
| Bascha was so funny, she had on a tank top, so she put a grocery bag on as a shirt (I think it could pass a modern Edwardian!), and said she was a earth friendly recycle person who was really into it :D |

Tada! You look like a bonafide idiot now! :D Go look in the mirror :) Don't move your arms too much though, you don't want to mess up your hard work :P
 |
| me |
 |
| Bascha |
Now take a pair of scissors (not fabric scissors), and cut straight up the back. Do not cut your bra...especially if it's expensive. This dress form is supposed to save you money.

Now you've got your second body. Lay it out on the floor or table. Put some stuffing in the bosom dips. We found it easier to stuff the bosom by putting in a lot of stuffing in the whole upper body, then taping the whole body shut, then adding more stuffing, taped the arm's shut, and then packed the filling in really snugly in the bust area.

 |
| Bascha's mannequin is stuffed with a variety of things since by then we had run out of stuffing. Pillow insides, pillow cases, scrap fabric, torn tissue paper, tangled yarn, and pieces of wadded tape make up the insides of her second self :). |
 |
my mannequin Lettice before we gave her a two inch waist reduction. I'm not really sure what happened but her measurements were a little off! She still needs a bit added to her behind as well...poor lady! :O I've named her Lettice since that's one of my first person names at Latta.  Bascha has given hers the name "BaJosh" *said in baby voice :D* which is what my baby brother calls her. |


~Theresa
and
~Bascha
Oh too much fun! Awesome job, guys! :D I would have loved to do it with you!
ReplyDeleteLove,
Ruth
ikr? I would love to do it to you :P It's really practical and saves a LOT of money! :D I can't say enough how much I'm loving it!
Delete~Theresa
Thanks Ruth! Maybe sometime we can make one with you!! :)
ReplyDelete~Bascha
Cool! :-D A really good idea! I liked it :-) It looks like you had a LOT of fun when you made those dress forms.
ReplyDeleteYes, I think we have a lot of fun no matter what we make :). And being together makes anything that is normally just fun, even more fun! :D
Delete~Theresa
Hi, my name is Molly, and I just found your blog!
ReplyDeleteI would really like to get into historical (mostly 18th century) accurate clothing. I would like to make the stays and all goes with it. Unfortunately I don't quiet know where to start -- what patterns to use, and any tips and tricks.
I've been sewing for about 2 years now and have made many 1950's styled dresses, but nothing older than that. I was wondering if you might have some tips and good pattern recourses you could share with me.
I would really love to get into more 18th century reenacting, but I don't believe there is much of any since I live in Illinois. I have done a bit at Lincoln's New Salem, an 1830's setting, but it's not really what I like.
So if all else fails, I should hope to make an colonial period correct dress to wear on the 4th of July at least. :D Any excuse to dress up works for me!
Anyway, if you could be so kind as to point me in some direction on where I should get started!
Thanks much!
~Molly
Hello Molly!! The Rev War is my absolute favorite time period! I just finished making my mom a blue plaid Rev War polonaise that she has been wanting for two years. :) Which soon will be posted on the blog along with the polonaise that I made for myself back in September. I mainly use paintings and original garments as a reference when I make a garment. John Singleton Copley has some great paintings I like to refer to. Also Joseph Blackburn has quiet a few paintings of women's fashion during the the 1700's. There is also two books about Rev War fashion that I like, The Patterns of Fashion 1 by Janet Arnold and What Clothes Reveal: The Language of Clothing in Colonial and Federal America by Linda Baumgarten (I really want that book). I know several people that own those books and I have been able to look through them and read them. They are great! Also J.P. Ryan patterns (mainly what I use for my Rev War patterns) has variety of different women's fashion. I have used their strapless stay pattern, short gown, and polonaise patterns and they have all worked out really well. :D
DeleteI love to dress up as well, whether it is Thanksgiving, Christmas, or Independence day. <3 That is why I love to volunteer at Latta Plantation. I would much prefer to wear time period clothing than the clothing of today.
By the way, may I ask how you found our blog?
Hope this helps,
~Bascha
I just sent you an email, Molly, I think...if you don't get it let me know! It says it's over 4,096 characters so it won't let me comment it here! :O
Delete~Theresa
Molly, I don't think the email will reach you, so I'm going to just put it in sections here. I hope the links show up!
ReplyDelete"Oh how sweet! I saw you dresses on your blog (following a few of them :D), and they are super cute. I haven't made much yet for modern wear, but historical is my niche :). I don't know much about the 1830's, since I've never sewed for that, but for RevWar I could offer some info. This may overwhelm you at first, but I'm just trying to think of stuff that would be helpful! And even though making a costume seems like a CRAZY amount of work, it's really really enjoyable, and quite a learning experience. It doesn't seem like a ton of work to me, but my mama might disagree :P. But please don't let this scare you! :D And we're still learning, and things rarely turn out perfect the first time. But please don't freak out when you read this!!!
To start you'll need a shift. I did not actually use a pattern for mine, but drafted my own after reading up on-line. Here are a few links in regards to shifts.
ReplyDeletehttp://brocadegoddess.wordpress.com/linen-shift/ this is overview to how it's made. I suggest you do a google search to find pictures of different sleeve or neckline styles so you know what you like. Drawstring neck is simple and versatile. It allows you to adjust how low or how you prefer the neckline to be. http://www.sharonburnston.com/shifts.html
http://www.marariley.net/shift/shift.htm
http://www.marquise.de/en/1700/howto/frauen/18chemise.shtml
shifts were normally linen. Mine are white cotton (from sheets bought at the thrift store). I am still on the lookout for linen on sale to make a shift with.
Stays come next. These are worn over the shift. This is an article about stays. http://brocadegoddess.wordpress.com/stays/ and how they are made
ReplyDeletehttp://www.jpryan.com/details/stays.html this is the stay pattern we used. I like it, but it gives a very flat front. The shape you get is also kind of how you bone it. Bascha and I both boned ours like this, which is good for larger busts: http://www.google.com/imgres?sa=X&rlz=1C1CHWA_enUS518US518&espv=210&es_sm=93&biw=1600&bih=799&tbm=isch&tbnid=nwZywaOaNM57kM:&imgrefurl=http://www.sillysisters.com/undergarments.htm&docid=mKuugjJFUKRVyM&imgurl=http://www.sillysisters.com/ss%252520stays,%252520backlacing,%252520bound.jpg&w=640&h=480&ei=gBFrUoG_HdKtkAf_64HIAQ&zoom=1&ved=1t:3588,r:12,s:0,i:117&iact=rc&page=1&tbnh=170&tbnw=194&start=0&ndsp=33&tx=105&ty=71 but if you want a more centered "chest" (typically if you are smaller busted) then you can make the boning go towards the center. Like this: http://www.google.com/imgres?start=145&rlz=1C1CHWA_enUS518US518&espv=210&es_sm=93&biw=1600&bih=799&tbm=isch&tbnid=Lz1eI5bYUam3bM:&imgrefurl=http://quinnmburgess.wordpress.com/tag/cane-boning/&docid=Y8fespQLxAbseM&imgurl=http://quinnmburgess.files.wordpress.com/2011/10/1780s-corset-9.jpg&w=1824&h=1368&ei=lxVrUsLMF8ahkQeY_IB4&zoom=1&ved=1t:3588,r:62,s:100,i:190&iact=rc&page=5&tbnh=180&tbnw=241&ndsp=45&tx=53&ty=92 To bone mine I printed out that first picture and made my boning channels accordingly.
There are other ways of boning stays as well. I have never tried them out though.
http://augustintytar.blogspot.com/2012/05/1780s-stays-2012.html this shows the steps in making stays (this is like my most favorite costume blog ever! Her work is amazing!!!)
ReplyDeleteFor fabric, you will probably want a linen lining (not thin linen, but not thick either) If money is in the question though (it is for us...mine are only lined with linen because it came in a kit), cotton will do just as well. A friend lined hers with cotton from a man's shirt. (like a button down) bought at the thrift store. For an interlining, you'll need canvas. You can pick up a yard or so on sale at a fabric store near you for pretty cheap. For fashion fabric, we all used linen. You can use silk or brocade (if portraying gentry), but from my understanding, that is actually a 4th layer. (these things appear to be bullet proof!) The JP Ryan instructions tell more on how the stays are sewn as well.
For boning. Since obviously we don't have access to wale-bone, ash wood or reed/cane seems to be popular. I know several of the interpreters at Colonial Williamsburg used Ash wood in theirs, but most of us used reed/cane. You can buy this online. Check around for pricing.
Others use German plastic boning. http://demodecouture.com/2012/05/18th-c-boning-research-german-plastic-boning-review/
and some prefer steel https://www.farthingalescorsetmakingsupplies.com/ (farthingales, though I have never ordered from them get good reviews. It can be pricey, but one you see what you would be on the lookout for, you could search around for a better price maybe).
Another option which is really inexpensive and easy is zip ties. We did that for stays my sister made for a friend and it worked out well. I would not recommend this if you have serious curves, or if you will be out in the heat for long stretches of time. It doesn't breath too well (plastic! :P) and will start to mold to your body which in this case isn't really what you want. The heavy duty zip ties do make a good shape though. Also on boning, you'll double bone (meaning put two bones in one casing) the casing at the very edge of each stay, next to the eyelets. You'll also want to double bone the two center front casings (if you do the bones vertical). Tips on boning... round off the edges of the bones, and don't make them too long, or they'll end up poking out of your binding! The bones should fit snugly in the channels, but not too snugly.
Binding the stays. My sister and I both used soft leather from http://sillysisters.com/otheritems.htm We actually bought the stay kit, but I'm not sure if they carry that anymore. You can also use self fabric, and bias tape. Neither will hold up for as long as leather, but they are both acceptable and cost less. Binding to me is the hardest part, not because it was really difficult but because it is time consuming. Very time consuming. Here is a link on binding. http://yourwardrobeunlockd.com/articles/free/advanced/356-perfect-binding-part-1-by-cathy-hay
ReplyDeleteYou will have eyelets on your stay. This is the holes through which your laces go. They are made like so: http://www.curiousfrau.com/tutorials/88-how-to-make-beautiful-hand-bound-eyelets I used a hole punch thing to make the hole, and then I pushed a pencil back and forth until it opened up some.
Busks. This is inserted between your stay and shift in the center front. We use a paint stick from Lowe's. The busk helps keep the shape of the stay.
http://twonerdyhistorygirls.blogspot.com/2011/08/how-to-lace-your-stays-by-yourself-c.html if you are in a pickle and need to lace stays by yourself, this is how you do it. For the actual laces, cotton twill tape works. the half inch kind. We have found it can be a little weak with repeated wear, so I use white 1/2'' ribbon. Satin ribbon could work too, but I'm always worried it would slip.
Bum rolls/hip rolls are optional. I do not have one yet, but Bascha does. I don't know what impression you are going for, we do lower, and like middle-ish class. For like this, or like regular wear, this type of bum roll was popular. http://demodecouture.com/18th-century-skirt-supports/ ; http://demodecouture.com/late-18th-century-skirt-supports/ ; others can vary in shapes, such as this (more for fancier wear i believe) http://themerrydressmaker.blogspot.com/2012/02/bummrolling-it.html ; http://americanduchess.blogspot.com/2013/10/the-angel-wing-bum-1785.html
ReplyDeleteYou don't have to have pockets, but they are very nifty little things. You can make one, or a pair, they can be plain linen or cotton (we used linen) and they can be lavishly embroidered as well. If you want to embroider, you can do some looking at original pockets and then copy their design. http://quinnmburgess.wordpress.com/2012/02/04/a-future-project-18th-century-pockets/ : http://www.larsdatter.com/18c/pockets.html : http://www.cfgriffith.com/2011/01/20/my-first-embroidery-project-18th-century-pocket/
ReplyDeleteIf you are feeling brave, you could sew your own socks. :p http://www.marariley.net/knitting/stocking.htm : http://www.marquise.de/en/1700/howto/struempfe.shtml : http://augustintytar.blogspot.com/2011/09/late-18th-century-stockings-2011.html : If you are like most of us, you can buy socks :D. Knee highs work fine, even though period socks are over the knee and held up with garters. Black is a good color, though there were many colors. If i'm not mistaken white was used primarily for "nicer". You can buy over the thigh socks online, or in Williamsburg, or maybe at a reenactment.
Stockings were held up with garters. These can be quite easy to make, or more difficult. http://thepragmaticcostumer.wordpress.com/2013/02/09/ten-minute-cheaters-tutorial-18th-century-garters/ : http://anhistoricallady.blogspot.com/2010/11/scandalous-18th-century-french-garters.html : http://fuchsias18thcdress.wordpress.com/2009/02/18/cane-and-garters-its-all-in-the-details/ : http://augustintytar.blogspot.com/2011/09/late-18th-century-garters-2011.htmla piece of ribbon will work.
Everyone wore caps. These were normally lightweight linen. There are many different styles, and of course how you choose to decorate. I have made one cap following these directions. http://people.csail.mit.edu/sfelshin/BRY2K/making-caps.html
ReplyDeleteothers : http://www.couturemayah.info/eng18th%20century%20caps.html : http://artbeautyandwell-orderedchaos.blogspot.com/2009/05/how-to-make-18th-century-cap.html : http://www.marquise.de/en/1700/howto/frauen/18hauben.shtml :
You could use a pattern as well. http://www.oldtimepatterns.com/JPR10.html : http://www.oldtimepatterns.com/JPR09.html : http://www.oldtimepatterns.com/MM9503.html : http://www.oldtimepatterns.com/CWH03b.html : http://www.oldtimepatterns.com/CWH04b.html
Because stays make lots of cleavage, and the necklines of the day were often low, many women wore what's called a neckerchief. This is very simple to make, and it covers your neck and bare chest for sun coverage and modesty. I've made several by using a pillow case. I also made one (that my sister is wearing here: http://twoteenseamstresses.blogspot.com/2013/08/the-blog-petticoat.html out of an embroidered cotton sundress. :D)They were normally lightweight linen, but sometimes cotton. here are some links about them and how to make them. http://americanduchess.blogspot.com/2012/09/v269-baby-neckerchief-from-baby-gown.html : http://www.18cnewenglandlife.org/18cnel/neckerchief.htm : http://mouseborgdesigns.blogspot.com/2013/09/a-neckerchief-made-from-skirt.html : http://thegoldenscissors.blogspot.com/2012/04/choosing-words.html : http://www.larsdatter.com/18c/fichu.html :
ReplyDeleteOver this you'll put petticoats. In winter I wear a wool petti, and a white cotton one (from sheets). You can make a quilted petticoat, an embroidered petticoat, or a plain one. They can be made of wool, linen, or cotton. Here are some links. http://www.koshka-the-cat.com/18c_petticoat.html ; http://www.marquise.de/en/1700/howto/frauen/rock.shtml ; You'll need to at least have one under petticoat (that doesn't show) and one outer petticoat (the one that shows). If you are portraying a wealthier person, you could trim your outer petticoat (use original garments as inspiration), or use fancier materials (fabric). http://fashionablefrolick.blogspot.com/2011/04/threaded-bliss-tutorial.html
ReplyDeleteNow to the actual clothes part. Popular in all classes of life was the gown. There are several styles of gowns. Here is a tutorial on how to drape a saque gown: (not for working class!)http://koshka-the-cat.blogspot.com/2011/03/draping-sort-of-sacque-part-one.html : http://koshka-the-cat.blogspot.com/2011/03/draping-sort-of-sacque-part-two.html : http://koshka-the-cat.blogspot.com/2011/03/draping-sort-of-sacque-part-three.html : http://koshka-the-cat.blogspot.com/2011/03/draping-sort-of-sacque-part-four.html : http://koshka-the-cat.blogspot.com/2011/05/draping-sort-of-sacque-part-five.html : http://koshka-the-cat.blogspot.com/2011/05/draping-sort-of-sacque-part-six.html : http://koshka-the-cat.blogspot.com/2011/05/draping-sort-of-sacque-part-seven.html : http://koshka-the-cat.blogspot.com/2011/05/draping-sort-of-sacque-part-eight-back.html : http://koshka-the-cat.blogspot.com/2013/01/a-sacque-or-robe-la-francaise-tutorial.html
ReplyDeleteAnd some more info on draping a different style: http://koshka-the-cat.blogspot.com/2012/12/a-robe-langlaise-or-en-fourreau-gown.html : http://koshka-the-cat.blogspot.com/2012/12/a-robe-langlaise-or-en-fourreau-gown_25.html : http://koshka-the-cat.blogspot.com/2012/12/a-robe-langlaise-or-en-fourreau-gown_26.html : http://koshka-the-cat.blogspot.com/2012/12/a-robe-langlaise-or-en-fourreau-gown_5550.html
this is a pattern Bascha has made twice now. She really likes it. http://www.jpryan.com/details/anglaise.html And here are some more reliable patterns from them. http://www.jpryan.com/details/petenlair.htm and this pattern http://www.wmboothdraper.com/store/index.php?main_page=product_info&cPath=10&products_id=499 : http://www.oldtimepatterns.com/TG232.html
About setting sleeves: http://koshka-the-cat.blogspot.com/2012/10/setting-18th-century-sleeves.html : http://americanduchess.blogspot.com/2011/06/setting-18th-century-sleeves-18th.html
ReplyDeleteGown fabrics are: wool (light weight), cotton, polished cotton, linen (linen was VERY popular for all classes), and silk to name some. They were normally lined. Linings were stitched on different than modern and more often than not, made of linen. Often it was whip stitched to the fashion fabric, or sometimes top stitched. Here are some period sewing techniques. http://www.marquise.de/en/themes/howto/technik.shtml
sometimes for working women wore what's called a bed gown. Sometimes they did not wear stays under it. I made one for my mom, and did not use a pattern. There are patterns though : http://www.jpryan.com/details/manteau.html : http://www.kannikskorner.com/patwomen.htm : http://www.burnleyandtrowbridge.com/millfarmeuropeanbedgownpattern.aspx : http://www.wmboothdraper.com/store/index.php?main_page=product_info&cPath=10&products_id=977
ReplyDeleteIf you choose to not use a pattern, here are some links: http://www.marquise.de/en/1700/howto/frauen/18mdelit.shtml
and here are some on bedgowns in general http://www.larsdatter.com/18c/bedgowns.html : http://www.18cnewenglandlife.org/short_gown.htm :
For undress wear, short gowns were also worn. They can be as elaborate or as simple as your impression permits. Bascha and I have made this pattern up several times and we both like it. http://www.jpryan.com/details/jacket.html and I would recamend it. there are also other patterns out there : http://www.burnleyandtrowbridge.com/millfarmshortgownwithshiftandpetticoatdirectionspattern.aspx : http://www.amazon.com/18th-Century-Short-Gown-Pattern/dp/B008LOLCXG : http://www.marariley.net/jackets/shortgown.htm : http://www.oldtimepatterns.com/TG129.html : http://www.oldtimepatterns.com/JPR15.html there are some others but I can't find them at the moment :O
about short gowns: http://www.larsdatter.com/18c/shortgowns.html
I have not yet studied caraco jackets, but here are some links to them : http://www.jpryan.com/details/caraco.html : http://www.burnleyandtrowbridge.com/millfarmcaracopattern.aspx : http://www.etsy.com/listing/113221461/pattern-18th-century-caraco-14-16-and-22 : http://www.etsy.com/listing/153524059/wn217-18th-century-caraco-pattern-2-size?ref=&sref= : http://elizabethcbunce.wordpress.com/historical-costuming/18th-century-middle-class-ensemble/caraco-jacket-petticoat/ : http://teainateacup.wordpress.com/2012/10/04/a-caraco-jacket/ : http://fuchsias18thcdress.wordpress.com/tag/caraco/ :
ReplyDeletehttp://www.marquise.de/en/1700/index.shtml just about 18th century clothing
Shoes are probably the trickiest part of all...and the most costly. If you aren't to picky, you could try searching thrift stores to find a shoe that looks similar in shape and style to those of the time period. This is what we have done. And we've gotten lucky too :D. You could also go barefoot in the summer (i do it all the time! :D) if you are not doing an upper class impression. Shoes can be ordered online, I know these two have gotten good reviews : http://www.american-duchess.com/shoes-18th-century : http://www.american-duchess.com/shoes-18th-century/pompadour-french-court-shoe-black : http://www.american-duchess.com/shoes-18th-century/kensington-18th-century-shoe-black : and this website appears to be down at the moment. but here is the link anyway. http://www.fugawee.com/womens_colonial.htm
Or you could make your own. http://www.sarahjuniper.co.uk/handm1.html : http://augustintytar.blogspot.com/2011/09/c-1770s-shoes-2011.html : http://twonerdyhistorygirls.blogspot.com/2010/10/crafting-shoes-for-18th-century-lady.html : http://yourwardrobeunlockd.com/freebies/155-making-18th-century-shoes-by-loren-dearborn : http://madameberg.blogspot.com/2009/10/post-about-shoes.html :
Hats were normally worn when going out of the house. They were used to shade the face (white skin was quite popular) when outdoors. Mine is a wall decor hat I've ripped all the junk off of, and it works well for now. If you find a good hat that has a hat part that's too tall, here are some things that show how to shorten it. http://possessionsofalady.blogspot.com/2011_06_01_archive.html : http://thedreamstress.com/2013/03/tutorial-how-to-turn-a-straw-sunhat-into-an-18th-century-bergere/ : http://madameberg.blogspot.com/2009/08/making-straw-hat-easy-and-cheap-way.html : And here are some things on hats and decorating them. http://www.couturemayah.info/eng%2018th%20century%20hats.html : http://americanduchess.blogspot.com/2009/04/great-hats-of-late-18th-c-what-are-they.html : and just do some searching on google for trim ideas that you like that would suit your persona. I think pinterest is excellent for this!!!
ReplyDeleteI really hope this helps, if you have any more questions, or questions about something specific, or want to do "tech" fitting with anything (meaning you send me pictures (or we like webcam) of issues, mock ups, etc. and I try to help along the way) that is fine too. I did that with a lady for my stays (she helped me) :D. But please, any thing we can do to assist you! If I don't know the answer I can find out! :D
Oh my goodness, thank you so so much!! I feel so happy and excited right now!! I can't tell you how much this helps me and means to me!!
ReplyDeleteTo answer your first question, I was looking at various sewing blogs on 18th century styles, and I think I must have found your blog somewhere along the way. I'm not even sure how I stumbled across it, but it was probably though a comment or side bar link. I'm not sure. lol
I feel like there is a whole wealth of information right here, and I can't thank you enough for compiling all this for me!!! So far, I have started out with buying this pattern for the stays. (I had purchased this a few days before I found your blog. I had read a few blogs mention they used this pattern -- so hope it works all right. :)
http://www.etsy.com/listing/79371756/corset-pattern-hardwood-busk-georgian?ref=shop_home_active
I am wanting to make a middle / lower class dress too. Not so interested in the higher class style.
So I think I will be going to an English Country dance in late February or March, so I really hope I can get this all done for then. I have a question though. Do you sew your gowns by hand or machine? I have found a few blogs where they sew it all by hand, and by reading those tutorials, it doesn't seam like it would be easy to sew it with a machine. I wouldn't mind a challenge of doing it by hand, but I was wondering what you two did. Here is one of the blogs that shows it done by hand:
http://koshka-the-cat.blogspot.com/2012/12/a-robe-langlaise-or-en-fourreau-gown_25.html
Also, you can email me at: mollyd93@gmail.com It might be easier than trying to do this though blog comments. :D
Anyway, I have to go to work so I will wrap this comment up. I'll let you know when I get my pattern for stays in the mail when I start having questions. :D Thank you so so much for all your help!
Talk to you later!
~Molly
Hey Molly,
ReplyDeleteI have heard that the Mantua Maker Patterns work pretty well. You will have to tell us what you think of it. :)
I try to sew as many things as possible by hand. My polonaise (still needing to be posted) I sewed entirely by hand. For me, it depends on the amount of time I have to spend on it. :P It doesn't take too much more time to sew garments by hand and you really feel accomplished when you finish a garment (and pc, sewing machines weren't invented till the 1820's).
We love Koshka-the-Cat!!! Theresa will be using her pattern for long stays soon. :)
I will add you to my contacts. :D
Talk to you soon,
~Bascha