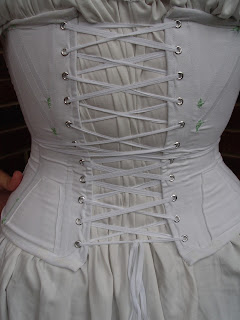
Well here is my first attempt at a blog post. Here goes! :)
I began a Civil War corset the other day using the Simplicity pattern 2890. This is the first corset I have made and so far it has been pretty simple. It is a very easy pattern and the directions are easy to follow. The only thing that I would recommend; is sew in a lining to help with support. Theresa added reed boning to the bust gussets for support (which I will do also). I made my chemise from another pattern which I might write a post on later. And for my bloomers; I bought a pair of linen pants from the thrift store and turned them into a pair of 1860's bloomers!! Love the thrift store!! <3

For my boning I have ordered the boning kit from Originals-by-Kay,Originals-by-Kay. Which are absolutely great. If you are making a civil war corset with this pattern I would highly recommend using Kay's, she is cheap and they arrived in no time! :D
For the front of my corset I used a cotton twill and for my lining I am using a cotton with a paisley pattern. After I had finished washing both materials, they were both so soft!
I first made a mock up of my corset with some scrape sheet I had and decided with the help of Theresa to make the bottom of the corset a size larger. But other than that it seemed to fit pretty well in all of the other places. :) So lucky for me I didn't have to make many alterations! I usually like to make a mock up of garments that look like they are going to be tricky to sew or need a perfect fit (such as a corset).
I started off with sewing all the stitching lines, then sewing the dart in the front of the corset. I then made a slit down the middle of the stitching lines. I attached all of the gussets by matching the edge of the gusset to slit and stitching lines as so:
After I sewed down the gussets I had a bit of extra material near the point, as you can see in the first photo, so I just cut it off. :P
The front side gusset.
The back side gusset. It was actually squared at the top.
After attaching all of the gussets I had to sew the front to the back with wrong sides together. Which for me, to sew two pieces of material with wrong sides together is scary. I always think I am sewing it wrong!
I then turn the seam into a french seam, which at first sounds difficult but is quite easy just a little bit more time consuming. After you sew a 5/8 seam allowance you cut one side of it to a 1/4 of an inch. The pattern had me cut the side towards the back. You then double fold the larger side of the seam flat over the top of the 1/4 inch seam. And then sew nearest to the edge.
And then you have this beautiful seam on the sides!
I just repeat all the same steps for the lining.
I then sewed the lining to the front with wrong sides together with a 1/4 inch seam allowance. I attached it all the way around, but I should have only attached it only on the sides. For now I shall have to seam rip most of the top for me to place my boning in it. :P
I am almost done with my corset!! The last step I did before my boning arrived was to fold and iron the sides to form a reinforcement for the eyelets.

All that is left now is to sew my boning in!!!!! :D
My completed corset!! Well at least half of it. :P
This is the flossing I did at the bottom of each bone. I used DCM cotton embroidery floss. Mint green my favorite color!
The flossing at the top of the bones.
Me in the corset!
For my binding I used scrap cloth from my corset lining.
The front
The side
Back
My civil war outfit, I did not make it, with the corset on. I have to make the bodice smaller!
It was fun making this post! Wow, there are 22 photos on this post, hehe! :D
~Bascha


Oh my goodness, that is one super rad corset! It fits so well, and the flossing is so dainty. Makes me wish I'd used that pattern when I made mine..
ReplyDeleteOh thanks Fiona! It was so sweet of you. I have viewed your blog several times and l love your sheer gown! Actually, I like a lot of the things you have made! :P It is so cool you play the harp. :) I will write more on your blog. You and I are the same age!!
Delete